


I’ll never forget standing in my driveway at 11 PM, holding a drill in one hand and my phone’s flashlight in the other, staring at a half-installed security camera that refused to connect to my Wi-Fi. The mounting bracket was crooked, I’d already punched three unnecessary holes in my siding, and I was seriously questioning whether I should’ve just paid someone to do this. That was three years and roughly 40 camera installations ago—back when I thought mounting a security camera was as simple as screwing in a lightbulb.
Here’s what nobody tells you upfront: installing a security camera isn’t particularly difficult, but doing it right requires understanding a handful of non-obvious technical considerations that directly impact whether your system actually protects your home or just gives you a false sense of security. After years of testing everything from budget Wyze cams to professional-grade Hikvision systems, I’ve learned that the difference between a functional security setup and an expensive lawn ornament often comes down to decisions you make before you ever pick up a drill.
In this guide, I’m walking you through the complete installation process based on real-world experience—not manufacturer marketing copy. You’ll learn the technical considerations that actually matter, the mistakes that cost me hours of troubleshooting, and the practical setup decisions that separate a camera that works from one that works well.
What I’ve Learned From Installing Cameras in Different Environments
My testing lab is also my home, which means I’ve installed cameras in almost every challenging scenario you can imagine: vinyl siding that flexes in the wind, brick walls that laugh at standard masonry bits, eaves with zero nearby power outlets, and one particularly stubborn corner where Wi-Fi signal drops to one bar. I’ve also consulted on installations for three small businesses and helped family members set up systems in everything from apartment balconies to rural properties with spotty internet.
What surprised me most wasn’t the physical installation—that’s actually the easy part. It was the number of variables that affect whether a camera delivers usable footage when something actually happens. During one test, I deliberately triggered motion events at different times of day and discovered that my “perfectly positioned” camera captured license plates beautifully at 2 PM but turned them into white blurs at 8 PM when headlights hit the lens. That single observation changed how I approach every installation now.
I also learned the hard way that camera specs mean almost nothing without context. A 4K camera sounds impressive until you realize your upload bandwidth can’t handle the stream, or that your NVR’s hard drive fills up in three days at that resolution. A camera rated for “night vision up to 100 feet” becomes useless when positioned under an eave that reflects IR light directly back into the lens, creating a white-out effect.
Understanding Camera Types and Their Installation Requirements
Before you mount anything, you need to match the camera type to both your security needs and your installation environment. This isn’t about features—it’s about physical compatibility with your property.
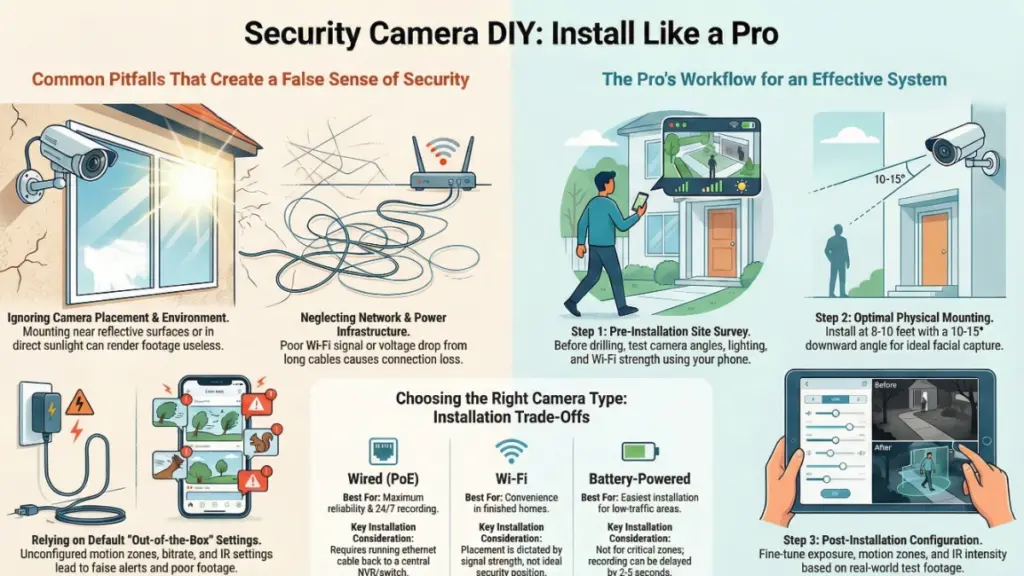
Wired (PoE) cameras run on Power over Ethernet, meaning a single cable handles both data and power. In my testing, these are the most reliable for 24/7 recording and the least prone to connectivity issues. The downside? You need to run ethernet cable from each camera back to a central NVR or PoE switch. I’ve installed these in scenarios ranging from simple (attic access above every camera location) to nightmarish (crawling through a 110°F attic in July to fish cable across 40 feet). If you have accessible attic space or unfinished basement areas, PoE is worth the initial effort. If you’re in a finished home with no cable pathways, it becomes exponentially more difficult.
Wi-Fi cameras seem like the obvious solution until you actually live with them. I currently run six Wi-Fi cameras across two properties, and I’ve learned that placement is entirely dictated by signal strength, not security needs. That perfect corner view? Useless if it’s two walls away from your router. During testing, I found that even cameras showing “excellent” signal in the app would occasionally drop frames during critical motion events, especially when multiple cameras streamed simultaneously. I now use a dedicated Wi-Fi mesh node specifically for my outdoor cameras—it solved 90% of my connectivity issues.
Battery-powered cameras offer the easiest installation but come with the most compromises. I’ve tested models from Ring, Arlo, and Reolink, and the pattern is consistent: they work great for monitoring low-traffic areas where you check footage occasionally, but they’re not suitable for continuous recording or high-activity zones. The cameras use aggressive power-saving measures that introduce 2–5 second delays before recording starts after motion detection. I missed a package thief once because my battery camera didn’t wake up until he was already walking away.
The installation implication here is straightforward: if the location is critical for security (front door, driveway, main entry points), install wired or continuously-powered cameras. Save battery models for secondary locations like side gates or backyard monitoring.
The Technical Factors That Actually Affect Camera Performance
This is where most DIY installations go wrong—focusing on mounting height and angle while ignoring the technical variables that determine whether your footage is actually usable.
Field of view vs. detail capture is the fundamental trade-off. A 110° wide-angle lens covers more area but turns faces into pixelated blobs beyond 15 feet. A 75° lens captures facial detail at 25+ feet but misses activity at the edges of your property. During testing, I found the sweet spot is usually 90–100° for most residential applications, positioned to prioritize the area where identification matters most (usually the approach path to your door, not the entire yard).
Sensor size and low-light performance matter more than resolution. I’ve tested 4K cameras with tiny 1/3″ sensors that produce grainy, unusable footage in typical evening lighting, while 2K cameras with larger 1/2.8″ sensors delivered clean images. The spec to actually look for is minimum illumination rating (measured in lux)—anything below 0.01 lux typically performs well in ambient street lighting. True 0 lux cameras use IR or starlight sensors and work in complete darkness, but they cost significantly more.
IR reflection and positioning destroyed my first outdoor installation. I mounted a camera under a white vinyl soffit, and the IR illuminators turned nighttime footage into a blown-out white mess. The infrared light was bouncing off the soffit directly back into the lens. The solution: either position cameras away from reflective surfaces (minimum 2 feet), disable IR and add separate illumination, or angle the camera slightly downward so IR reflects away from the lens. I now test every nighttime position with a flashlight before drilling any holes—if I see bright reflections at camera height, IR will create the same problem.
Bitrate and compression settings determine whether your 4K camera actually delivers 4K detail. Most cameras default to highly compressed H.265 encoding at 4–8 Mbps to reduce storage and bandwidth demands. During testing, I found that boosting bitrate to 12–16 Mbps for 4K cameras dramatically improved detail in motion—suddenly I could read text on packages and see clothing details clearly. The trade-off is storage: a 4K camera at 15 Mbps uses about 6.5 GB per hour of footage. A 4TB drive stores roughly 615 hours, or about 25 days of continuous recording from one camera. This is why I run 1440p (2K) at 8 Mbps for most locations and only use 4K for critical entry points.
My Step-by-Step Installation Process (The Way That Actually Works)
I’ve refined this workflow through dozens of installations, and following this order saves significant backtracking.
Phase 1: Site Survey and Planning (Don’t Skip This)
Walk your property and identify coverage zones, not just camera locations. I use my phone to take test photos from potential mounting points, reviewing them later to check field of view and detail level. Pay specific attention to:
- Choke points: Areas where people must pass (walkways, driveways, doors)
- Lighting conditions: Note street lights, porch lights, and shadows throughout the day
- Obstructions: Trees, bushes, eaves, vehicles that might block the view
- Power access: Outlets within 25 feet for powered cameras
- Wi-Fi signal strength: Use a Wi-Fi analyzer app to check signal at each location
I mark potential camera positions with tape and review footage angles using my phone. This catches issues before drilling: one planned position had perfect daytime coverage but was completely dark at night because it faced away from all ambient lighting.
Phase 2: Infrastructure Setup
For PoE systems, run all ethernet cable before mounting any cameras. I use outdoor-rated Cat6 cable, even for interior runs—it’s more durable and supports higher bandwidth. My typical cable pathway involves:
- Attic/basement routing where possible
- Exterior conduit runs for exposed sections
- Drip loops at every camera location (cable dips below the entry point before entering the mounting location, preventing water infiltration)
- Service loops (12–18″ of extra cable coiled near each camera for future adjustments)
For Wi-Fi cameras, verify signal strength at each mounting location before installation. I mount the camera temporarily using painter’s tape and run it for 24 hours to confirm stable connectivity. I’ve avoided countless reinstallations this way.
Phase 3: Physical Mounting
The actual mounting is straightforward if you have the right tools and technique:
For vinyl/wood siding: Use stainless steel screws with silicone washers to prevent water infiltration. Pre-drill pilot holes slightly smaller than your screw diameter. Apply a bead of clear silicone around the mounting bracket after installation.
For brick/concrete: Use a hammer drill with appropriate masonry bits (typically 3/16″ or 1/4″ for standard camera anchors). Drill depth should be 1/4″ deeper than anchor length. Clean debris from holes using compressed air. I use Tapcon concrete anchors for permanent installations—they hold significantly better than plastic anchors in exterior applications.
For stucco: Drill through stucco into the underlying material (usually wood or concrete block). Don’t rely on anchors set only in stucco—they’ll fail within months from temperature cycling and vibration.
Critical mounting detail: Most cameras need slight downward angle (10–15°) for optimal face capture. Mount at 8–10 feet height for most residential applications—high enough to prevent tampering but low enough to capture facial detail. I made the mistake once of mounting at 12 feet for “better overview” and could barely identify faces in the footage.
Phase 4: Weatherproofing
Even “weatherproof” cameras benefit from proper sealing:
- Apply silicone around all cable entry points
- Create drip loops in cables before they enter junction boxes or camera housings
- Use electrical tape to seal any connector joints (even on “outdoor rated” connections)
- For ethernet connections, I use outdoor-rated RJ45 boots and apply additional silicone
I learned this the hard way when a supposedly waterproof camera connection corroded after three months of exposure. The green corrosion inside the ethernet connector caused intermittent disconnections that took hours to diagnose.
Phase 5: Camera Configuration
This is where technical understanding separates functional systems from optimized ones:
Resolution and framerate: I run 2K (1440p) at 20 fps for most cameras. It’s the sweet spot between detail and storage efficiency. For areas requiring license plate capture, I increase to 4K but reduce framerate to 15 fps to manage bitrate.
Exposure settings: Auto-exposure works poorly in mixed lighting. I manually set exposure for either daytime or nighttime priority depending on when security matters most for that location. My front door camera is optimized for nighttime (when most suspicious activity occurs), accepting that daytime footage is slightly overexposed.
Motion detection zones: Draw zones that exclude areas with constant motion (trees, street traffic, flags). I spent two weeks debugging “false alerts” before realizing my detection zone included a bush that moved in every breeze.
IR intensity: Most cameras default to 100% IR power, which causes overexposure at close range. I typically run 50–70% intensity and adjust based on nighttime test footage.
Common Installation Mistakes That Cost Me Hours of Troubleshooting
Mistake 1: Mounting cameras before testing network connectivity. I once installed four cameras in a single day, only to discover two had marginal Wi-Fi signal that caused constant buffering. Repositioning required re-drilling and patching old holes.
Mistake 2: Ignoring sun position. A camera facing east delivered perfect footage at noon but was completely blind every morning from direct sun glare. I now check sun position at different times using a sun-tracking app before finalizing camera angles.
Mistake 3: Undersizing storage. My first NVR had a 1TB drive that filled in six days with four cameras at high resolution. Upgrading to 4TB cost $100 and stores 30+ days of footage—should’ve started there.
Mistake 4: Using camera-included power adapters for long cable runs. Most cameras ship with 12V/1A adapters, but voltage drop over 50+ feet of cable causes performance issues. I now use 12V/2A adapters for any run exceeding 40 feet, which compensates for voltage loss.
Mistake 5: Not labeling cables. With six cameras and a rat’s nest of cable in my attic, identifying specific runs became impossible. I now label both ends of every cable during installation using a label maker.
System-Specific Considerations
For PoE/NVR Systems
- Calculate total power budget: each camera draws 4–9W depending on model and IR usage
- Plan for drive failure: I run two drives in my NVR and configure automatic backup to NAS
- Enable RTSP streams for integration with home automation if needed
- Set up remote access before leaving the local network (trying to troubleshoot remotely without initial access is impossible)
For Wi-Fi/Cloud Systems
- Configure upload bandwidth limits to prevent saturating your internet connection
- Understand cloud storage costs: continuous recording can cost $10–30/month per camera
- Enable local SD card backup as failsafe during internet outages
- Use 5GHz Wi-Fi for cameras supporting dual-band—far less congestion than 2.4GHz
For Solar/Battery Systems
- Position for maximum sun exposure (minimum 4–6 hours direct sunlight daily)
- Reduce motion detection sensitivity to extend battery life
- Accept 1–2 second recording delays as inherent trade-off
- Clean solar panels quarterly (dust reduces charging efficiency by 20–40% in my testing)
Actionable Installation Checklist
Before You Buy:
- ☐ Measure distances from router to camera locations (Wi-Fi systems)
- ☐ Verify power outlet availability or plan cable runs (PoE systems)
- ☐ Calculate storage needs: (# cameras × bitrate × hours recording) / 8 = GB per hour
- ☐ Check your internet upload bandwidth (need ~5 Mbps per camera for remote viewing)
Pre-Installation:
- ☐ Test Wi-Fi signal at each camera location
- ☐ Take test photos from mounting positions to verify coverage
- ☐ Check sun position throughout the day
- ☐ Identify cable pathways and mounting surface materials
During Installation:
- ☐ Pre-drill pilot holes for all mounting hardware
- ☐ Create drip loops before cable entry points
- ☐ Apply silicone to mounting brackets and cable entries
- ☐ Label all cables at both ends
- ☐ Install cameras at 8–10′ height with 10–15° downward angle
Post-Installation:
- ☐ Configure motion detection zones (exclude false trigger areas)
- ☐ Adjust IR intensity based on nighttime test footage
- ☐ Set recording resolution, framerate, and bitrate
- ☐ Test recording at different times of day
- ☐ Verify remote access functionality
- ☐ Document login credentials and camera positions
Don’t:
- ✗ Mount cameras under eaves closer than 2′ (IR reflection issues)
- ✗ Point cameras directly at sun paths (morning/evening blindness)
- ✗ Use plastic anchors in exterior brick/concrete (temperature cycling causes failure)
- ✗ Set all cameras to 4K without calculating storage requirements
- ✗ Rely solely on cloud storage without local backup
Frequently Asked Questions From Real Installations
How high should I mount security cameras?
From testing across multiple installations, 8–10 feet is the sweet spot for residential properties. This height is difficult to reach without a ladder (tampering resistance) while still capturing enough facial detail for identification. I’ve seen people mount cameras at 15+ feet for “security,” but footage from that height makes facial identification nearly impossible. The exception is if you’re specifically monitoring vehicle license plates, where 6–7 feet works better for angle and detail.
Can I install PoE cameras without an NVR?
Yes, using a PoE switch and recording software on a PC, but you lose the dedicated reliability of an NVR. I run both setups currently—four cameras on an NVR and two on a PoE switch feeding Blue Iris software on a dedicated PC. The NVR system has run 18 months without intervention. The PC system requires periodic software updates and occasional restarts. For non-technical users, an NVR is simpler. For advanced users wanting integration with home automation, the PC route offers more flexibility.
How do I prevent spider webs on cameras?
This plagued my installations until I discovered two solutions: apply a thin layer of Vaseline around (not on) the camera lens—spiders avoid the texture. Alternative solution: mount cameras under eaves or overhangs where spiders rarely build webs due to lack of attachment points. I also use cameras with deterrent features like rotating domes (spiders won’t build on moving surfaces). Cleaning frequency dropped from weekly to monthly after implementing these approaches.
What’s the minimum internet upload speed needed?
Plan for 3–5 Mbps upload per camera for smooth remote viewing at full resolution. Most residential internet provides asymmetric speeds (fast download, slow upload), so check your upload specifically. I have 300 Mbps download but only 35 Mbps upload, which caps me at roughly 6–7 cameras before remote viewing starts buffering. If you have limited upload, configure cameras to use substreams for remote viewing (lower resolution/bitrate) while recording high-resolution locally.
Should I DIY install or hire a professional?
If you’re comfortable with basic tools and have straightforward mounting surfaces (wood siding, accessible attic/basement), DIY saves $200–500 per camera in installation costs. Hire a professional if you’re dealing with difficult materials (brick, stone, stucco), long cable runs through finished spaces, or complex networking requirements. I’ve done both: DIY for my home system (saved ~$1200), hired professionals for my parents’ all-brick ranch with no attic access (saved weeks of frustration).
How often should I review/maintain camera systems?
I check my system weekly—verify all cameras recording, spot-check footage quality, confirm available storage space. Quarterly maintenance includes: cleaning camera lenses (compressed air and microfiber cloth), checking mounting hardware for looseness, cleaning solar panels (if applicable), and verifying backup systems work. I also test motion alerts monthly by deliberately triggering each camera to ensure notifications still function. Storage drives should be replaced every 3–4 years in 24/7 recording systems—security camera drives operate constantly unlike typical computer drives.
What I Wish Someone Had Told Me at the Beginning
Security cameras are infrastructure, not gadgets. The decisions you make during installation—camera positions, mounting quality, configuration settings—determine whether your system provides actual security or just psychological comfort. I’ve reviewed footage from dozens of installations where cameras captured incidents but failed to provide useful evidence because resolution was too low, angle was wrong, or nighttime settings weren’t optimized.
The most valuable lesson from three years of installation experience: prioritize coverage of approach paths over coverage of everything. One well-positioned camera capturing faces at a doorway provides more investigative value than three poorly positioned cameras showing the tops of people’s heads across your entire yard. Think like someone approaching your home—where would they walk, what would they look at, and how would you want to identify them later?
Your security system is only as reliable as its weakest link. In my testing, that weak link is almost never the camera—it’s usually the power supply in harsh weather, the Wi-Fi signal during peak usage, or the storage capacity running out at the worst possible time. Solve infrastructure problems during installation, not after an incident when you discover your cameras weren’t actually recording.
Finally, accept that camera installation is iterative. My current positions are the result of multiple adjustments based on actual footage review. Don’t expect perfection on the first attempt—plan to fine-tune angles, adjust settings, and reposition as needed. The difference between an adequate installation and an excellent one usually comes down to willingness to make those improvements based on real-world results.
